
Page 5 - Crown Head Owners Manual L91v0116v
P. 5
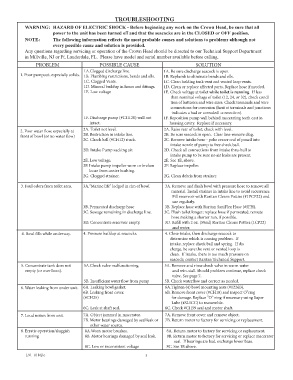
TROUBLESHOOTING
           WARNING:  HAZARD OF ELECTRIC SHOCK - Before beginning any work on the Crown Head, be sure that all
                       power to the unit has been turned off and that the seacocks are in the CLOSED or OFF position.
           NOTE:       The following information reflects the most probable causes and solutions to problems although not
                       every possible cause and solution is provided.
           Any questions regarding servicing or operation of the Crown Head should be directed to our Technical Support Department
           in Millville, NJ or Ft. Lauderdale, FL.  Please have model and serial number available before calling.
                PROBLEM                         POSSIBLE CAUSE                       SOLUTION
                                    1A.Clogged discharge line.         1A. Be sure discharge seacock is open.
          1. Poor pumpout, especially solids.  1B. Plumbing restrictions, bends and ells.   1B. Replumb to eliminate bends and ells.
                                    1C. Clogged Vents.               1C. Clean holding tank vent and vented loop vents.
                                    1D. Mineral buildup in hoses and fittings.   1D. Clean or replace affected parts. Replace hose if needed.
                                    1E. Low voltage                  1E. Check voltage at toilet while toilet is running.  If less
                                                                            than nominal voltage of toilet (12, 24, or 32), check condi
                                                                            tion of batteries and wire sizes. Check terminals and wire
                                                                            connections for corrosion (heat at terminals and junctions
                                                                             indicates a bad or corroded  connection).
                                    1F. Discharge pump (#CH120) wall not          1F. Reposition pump wall behind macerating teeth cast in
                                          intact.                          housing cavity.  Replace if necessary.
          2. Poor water flow, especially at                   2A. Toilet not level.                    2A. Raise rear of toilet; check with level.
          front of bowl (or no water flow)   2B. Restriction in intake line.                 2B. Be sure seacock is open.  Clear line-remove clog.
                                    2C. Check ball (#CH12) stuck.                2C. Remove intake hose - poke eraser end of pencil into
                                                                         intake nozzle of pump to free check ball.
                                    2D. Intake Pump sucking air.                 2D. Check all connections from intake thru-hull to
                                                                         intake pump to be sure no air leaks are present.
                                    2E. Low voltage.                         2E. See 1E, above.
                                    2F. Intake pump impeller worn or broken          2F. Replace impeller.
                                          loose from center bushing.
                                    2G. Clogged strainer.                       2G. Clean debris from strainer.

          3. Foul odors from toilet area.   3A.“Marine life” lodged in rim of bowl.               3A. Remove and flush bowl with pressure hose to remove all
                                                                          material. Install strainer in intake line to avoid recurrence.
                                                                           Fill reservoir with Raritan Cleans Potties (#1PCP22) and
                                                                           use regularly.
                                    3B. Permeated discharge hose                  3B. Replace hose with Raritan SaniFlex Hose (#SFH).
                                    3C. Sewage remaining in discharge line.             3C. Flush toilet longer; replace hose if permeated; reroute
                                                                          hose making a shorter run, if possible.
                                    3D. Concentrate reservoir empty.                  3D. Refill with 2 oz. (59ml) Raritan Cleans Potties (1CP22)
                                                                           and water.
           4. Bowl fills while underway.  4. Pressure buildup at seacocks.                 4. Close intake, then discharge seacock to
                                                                                             determine which is causing problem.  If
                                                                                   intake, replace check ball and spring.  If dis
                                                                                   charge, be sure the vent or vented loop is
                                                                                   clean.  If intake, there is too much pressure on
                                                                                   seacock; contact Raritan Technical Support.
          5. Concentrate tank does not      5A.Check valve malfunctioning.               5A. Remove and rinse check valve in warm water
              empty (or overflows).                                                  and rein-stall. Should problem continue, replace check
                                                                          valve. See page 7.
                                    5B. Insufficient water flow from pump              5B. Check waterflow and correct as needed.
          6. Water leaking from under unit.  6A. Leaking bowl gasket.                   6A.Tighten (4) bowl mounting nuts (#1226B).
                                    6B. Leaking front cover.                   6B. Remove front cover (#CH18) and inspect O”ring
                                    (#CH25)                               for damage. Replace “O” ring if necessary using Super
                                                                          Lube (#SL1CC) to reassemble.
                                    6C. Leak at shaft seal.                   6C. Check #CH59 seal and motor shaft.
          7. Loud noises from unit.   7A. Object jammed in macerator.                7A. Remove front cover and remove object.
                                    7B. Motor bearings damaged by seal leak or       7B. Return motor to factory for servicing or replacement.
                                           other water source.
          8. Erratic operation/sluggish         8A.Worn motor brushes.                    8A. Return motor to factory for servicing or replacement.
              running                8B. Motor bearings damaged by seal leak.           8B. Return motor to factory for servicing or replace macerator
                                                                            seal.  If bearings are bad, exchange lower base.
                                     8C. Low or inconsistent voltage                 8C. See 1E above.
            L91  0116jlc                                      5