
Page 2 - Raritan L206v0420v Water Heater Owners Manuls
P. 2
MAINTENANCE FIG 1
Following installation, temperature and pressure relief lever Plastic finish washer.
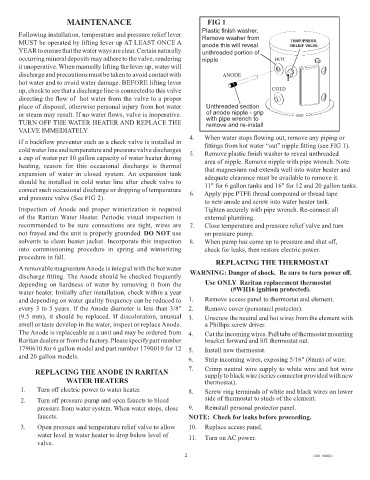
Plastic finish washer,
Remove washer from
press this in to reveal
MUST be operated by lifting lever up AT LEAST ONCE A anode this will reveal TEMP./PRESS.
unthreaded portion of
RELIEF VALVE
YEAR to ensure that the water ways are clear. Certain naturally unthreaded portion of
nipple
occurring mineral deposits may adhere to the valve, rendering nipple HOT
it unoperative. When manually lifting the lever up, water will
discharge and precautions must be taken to avoid contact with ANODE
hot water and to avoid water damage. BEFORE lifting lever
up, check to see that a discharge line is connected to this valve COLD
directing the flow of hot water from the valve to a proper
place of disposal, otherwise personal injury from hot water Unthreaded section
or steam may result. If no water flows, valve is inoperative. of anode nipple - grip
TURN OFF THE WATER HEATER AND REPLACE THE with pipe wrench to
remove and re-install
VALVE IMMEDIATELY.
If a backflow preventer such as a check valve is installed in 4. When water stops flowing out, remove any piping or
fittings from hot water “out” nipple fitting (see FIG 1).
cold water line and temperature and pressure valve discharges 5. Remove plastic finish washer to reveal unthreaded
a cup of water per 10 gallon capacity of water heater during area of nipple. Remove nipple with pipe wrench. Note
heating, reason for this occasional discharge is thermal that magnesium rod extends well into water heater and
expansion of water in closed system. An expansion tank adequate clearance must be available to remove it.
should be installed in cold water line after check valve to 11" for 6 gallon tanks and 16" for 12 and 20 gallon tanks.
correct such occasional discharge or dripping of temperature 6. Apply pipe PTFE thread compound or thread tape
and pressure valve (See FIG 2).
to new anode and screw into water heater tank.
Inspection of Anode and proper winterization is required Tighten securely with pipe wrench. Re-connect all
of the Raritan Water Heater. Periodic visual inspection is external plumbing.
recommended to be sure connections are tight, wires are 7. Close temperature and pressure relief valve and turn
not frayed and the unit is properly grounded. DO NOT use on pressure pump.
solvents to clean heater jacket. Incorporate this inspection 8. When pump has come up to pressure and shut off,
into commissioning procedure in spring and winterizing check for leaks, then restore electric power.
procedure in fall. REPLACING THE THERMOSTAT
A removable magnesium Anode is integral with the hot water
discharge fitting. The Anode should be checked frequently WARNING: Danger of shock. Be sure to turn power off.
depending on hardness of water by removing it from the Use ONLY Raritan replacement thermostat
water heater. Initially after installation, check within a year (#WH16 ignition protected).
and depending on water quality frequency can be reduced to 1. Remove access panel to thermostat and element.
every 3 to 5 years. If the Anode diameter is less than 3/8" 2. Remove cover (personnel protector).
(9.5 mm), it should be replaced. If discoloration, unusual 3. Unscrew the neutral and hot wires from the element with
smell or taste develop in the water, inspect or replace Anode. a Phillips screw driver.
The Anode is replaceable as a unit and may be ordered from 4. Cut the incoming wires. Pull tabs of thermostat mounting
Raritan dealers or from the factory. Please specify part number bracket forward and lift thermostat out.
1790610 for 6 gallon model and part number 1790010 for 12 5. Install new thermostat.
and 20 gallon models. 6. Strip incoming wires, exposing 5/16" (8mm) of wire.
REPLACING THE ANODE IN RARITAN 7. Crimp neutral wire supply to white wire and hot wire
supply to black wire (series connector provided with new
WATER HEATERS thermostat).
1. Turn off electric power to water heater. 8. Screw ring terminals of white and black wires on lower
2. Turn off pressure pump and open faucets to bleed side of thermostat to studs of the element.
pressure from water system. When water stops, close 9. Reinstall personal protector panel.
faucets. NOTE: Check for leaks before proceeding.
3. Open pressure and temperature relief valve to allow 10. Replace access panel.
water level in water heater to drop below level of 11. Turn on AC power.
valve.
2
2 L206 0420jlc