
Page 3 - Raritan L206v0420v Water Heater Owners Manuls
P. 3
WINTERIZING MOUNTING THE HEATER
Before beginning winterizing, be sure the power is turned 1. Select an area where the heater will not be subjected to
off to the water heater. Open all hot water taps on the boat water spray (especially salt water).
to relieve the pressure and allow cold water to cool the water NOTE: Access or hatch must be large enough for future
in the system. Remove both lines from the heater and allow servicing and/or replacement.
it to drain. After it has drained, blow it out with air pressure, 2. Position heater so that electrical cover plates, plumbing
if available. Pour a quart of nontoxic antifreeze (propylene nipples and heat exchanger fittings are easily accessible.
glycol) into the hot water fitting of the tank using a funnel and
short length of hose. Be sure power remains off until spring. 3. Using the four mounting holes provided, securely mount
When recommissioning in the spring, run water long enough heater to deck or other sturdy flat area. Stainless steel
5/16"(8mm) bolts or lag bolts with flat washers should
to ensure that all antifreeze has been flushed out and tank is be used to properly support the strain of a full unit while
filled BEFORE TURNING ON POWER. Heat exchangers are the boat is rocking.
winterized in conjunction with the boat’s engine cooling system.
Raritan 12 gallon and 20 gallon water heaters require
INSTALLATION auxiliary bracing, when the boat is in heavy seas. This is also
recommended for the 6 gallon models if excessive heeling and
Materials Required for Installation (not included with
water heater): pitching is expected. See FIG 4a (page 6) for optional bracing.
Plumbing: 3/4" NPT "Tee", check valve, expansion tank, PLUMBING
drain valve, PTFE tape, vacuum relief valve and shut-off valve. CAUTION: To reduce the risk of excessive pressure and
For hot water connections use hose or plastic tubing rated for temperature in this water heater, temperature and pressure
hot water use. If system will be used with dockside water sensitive protective equipment must be installed that meet
supply, a pressure regulator valve, set to match boat pressure the requirement of local codes. A device MUST NOT be
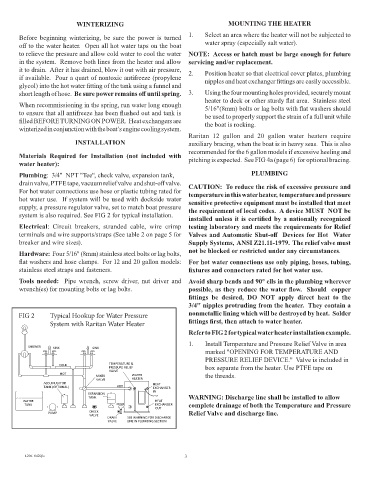
system is also required. See FIG 2 for typical installation. installed unless it is certified by a nationally recognized
Electrical: Circuit breakers, stranded cable, wire crimp testing laboratory and meets the requirements for Relief
terminals and wire supports/straps (See table 2 on page 5 for Valves and Automatic Shut-off Devices for Hot Water
breaker and wire sizes). Supply Systems, ANSI Z21.11-1979. The relief valve must
Hardware: Four 5/16" (8mm) stainless steel bolts or lag bolts, not be blocked or restricted under any circumstances.
flat washers and hose clamps. For 12 and 20 gallon models: For hot water connections use only piping, hoses, tubing,
stainless steel straps and fasteners. fixtures and connectors rated for hot water use.
Tools needed: Pipe wrench, screw driver, nut driver and Avoid sharp bends and 90° ells in the plumbing wherever
wrench(es) for mounting bolts or lag bolts. possible, as they reduce the water flow. Should copper
fittings be desired, DO NOT apply direct heat to the
3/4'' nipples protruding from the heater. They contain a
FIG 2 Typical Hookup for Water Pressure nonmetallic lining which will be destroyed by heat. Solder
System with Raritan Water Heater fittings first, then attach to water heater.
Refer to FIG 2 for typical water heater installation example.
1. Install Temperature and Pressure Relief Valve in area
SHOWER SINK SINK
marked "OPENING FOR TEMPERATURE AND
PRESSURE RELIEF DEVICE." Valve is included in
COLD TEMPERATURE &
PRESSURE RELIEF box separate from the heater. Use PTFE tape on
VALVE
HOT the threads.
MIXER WATER
VALVE HEATER
ACCUMULATOR HEAT
TANK (OPTIONAL) HOT EXCHANGER
IN
EXPANSION
TANK WARNING: Discharge line shall be installed to allow
WATER HEAT
TANK COLD EXCHANGER complete drainage of both the Temperature and Pressure
OUT
PUMP CHECK Relief Valve and discharge line.
VALVE
DRAIN SEE WARNING FOR DISCHARGE
VALVE LINE IN PLUMBING SECTION
3
L206 0420jlc 3